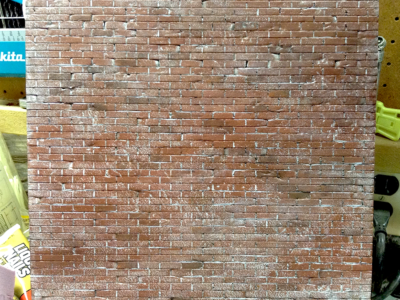
There are plenty of tutorials online about how to create brick walls for your diorama, but I found that I wanted a more realistic result for my action figure photography. Most of the examples I’ve seen have bricks that are way too large and are the size of cinder blocks or larger. A standard brick measures 2.25″ x 8″ so when you shrink that down to the 1/12 scale, you get a brick size that is 0.1875″ x 0.67″. For simplicity’s sake, I opted for a brick size of 0.25″ x 0.75″ since that was much easier to measure out with the ruler.
I started with a 1″ piece of foam insulation board. I primed it with grey paint, but I could have waited to paint it until a later stage. After measuring out every quarter inch, I scribed the horizontal lines using the tip of a mechanical pencil. Using the pencil rather than an X-Acto knife gives a rough line, like what you would see on old crumbling mortar lines.
All the horizontal lines are done! You can see in this photo how the bricks will be accurately sized for 6-7″ action figures.
Using the ruler and mechanical pencil again, the short vertical edges of the bricks are scribed every 3/4″. Cutting across the grain of the insulation board results in a much rougher line, which was fine for this application, but a blade should be used if you want cleaner lines.
All done! Scribing all those lines may have been a chore, but the results are definitely worth the effort.
Since I wanted an old, crumbly wall, the surface needed to be roughed up. My tools of choice: 40 grit sandpaper, a rubber mallet, and a rock. There’s no secret to this, just scratch the surface and beat it up — just be careful not to go too far. Rotate the foam board so that the distressing is not repetitive.
Here is what the wall looks like after a bit of distressing — not bad, but it needs more!
I used a flat head screwdriver to press in random bricks. This step made a huge difference and really made the wall start to look like it was old and weather-beaten.
The wall looks different depending on the light source, which will add a great deal of interest to the photos I plan to take with this backdrop.
Now, it’s time to paint! I used several layers of dry brushed reds and browns, building up the color more in some parts than others.
After the painted bricks dried, I applied a liberal amount of black wash, which is just black paint mixed with water.
After the wash was applied, I scrubbed it with a paper towel, which results in some interesting mottled effects as some of the red colored paint was removed.
After the black wash dried completely, I went over the whole wall with a white wash (diluted white paint), and while it was wet, removed most of it with a crumpled up paper towel.
It was tempting to leave the walls like this, but I felt like they could use some more painting.
With a square brush, I went in and colored random bricks with a variety of diluted browns, blacks, and oranges. I also used a fine tipped brush and added grayish white mortar. This step really brought the wall to life.
All done! The finished result looks like a brick wall that you might find in the old part of town that’s starting to crumble and show its age. The bricks don’t have perfect edges and smooth faces, they’ve been around a while, and have seen plenty of weather. Some of the bricks are crumbling and cracked, and calcium deposits have built up over time to give a whitewash look to portions of the walls.
The walls look pretty good on their own, but the magic happens when you add some props. Place a figure in the scene and then adjust the lighting and it all comes together nicely.
Despite how great this wall looks, it was a fairly easy project and I would highly recommend it to even a beginner diorama builder. If you don’t want to carve hundreds of bricks, go ahead and make them bigger. The steps remain the same, and I think you’ll be happy with the result!